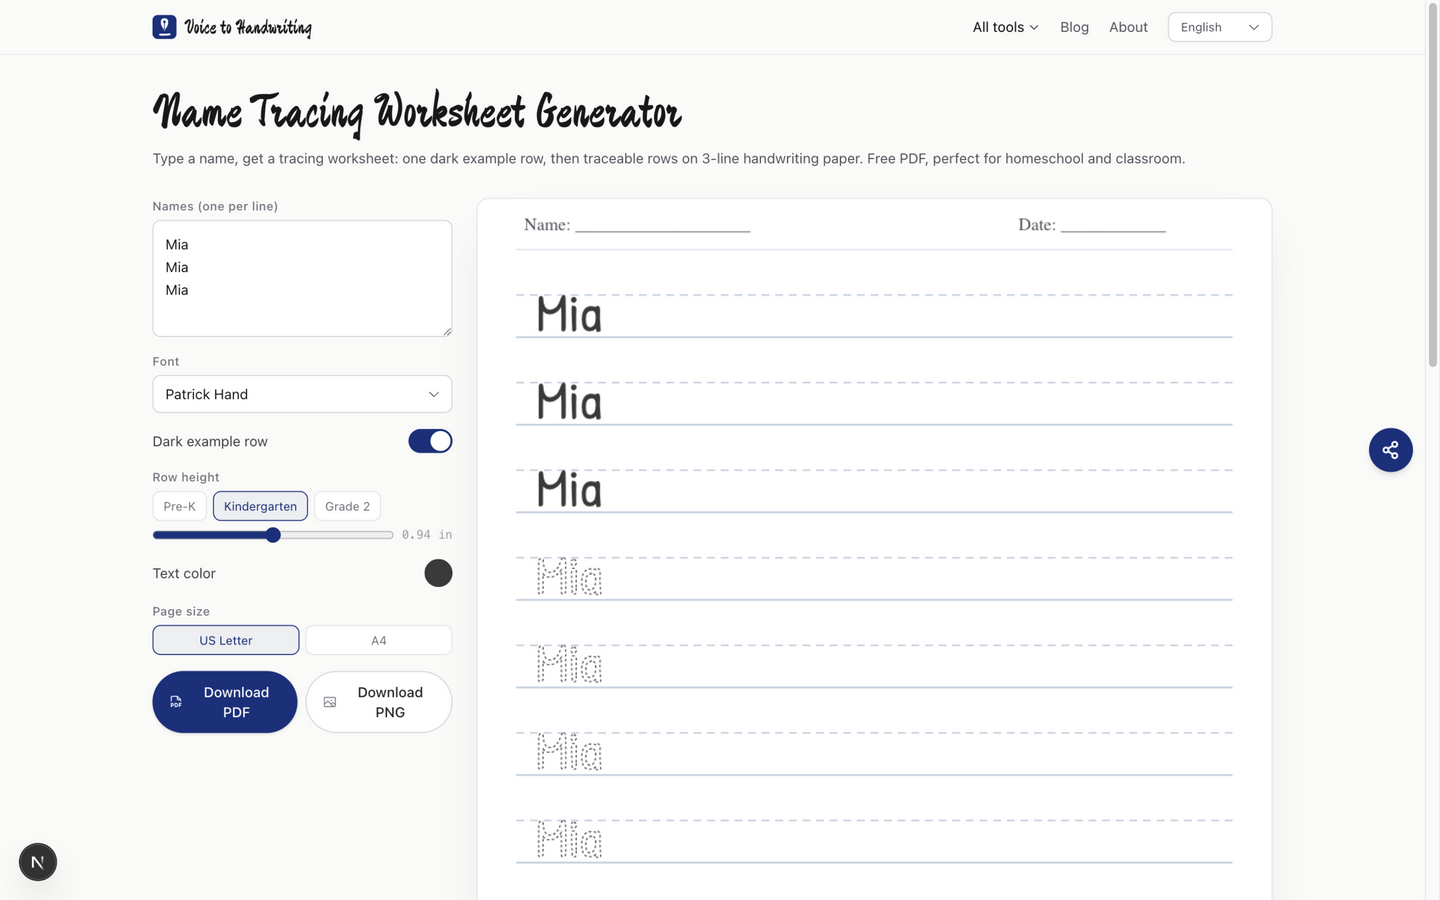
Name tracing with lines: free three-line worksheets to print
Somewhere around the third week of kindergarten, almost every parent sees the same thing: the name that started at the top of the page ends up sliding off the bottom. Nothing is wrong with your child's handwriting. The paper just has no rails. Name tracing with lines fixes exactly that — a dark model of your child's name, dotted rows to trace underneath, and three lines that tell a wobbly letter where it lives.
You can print one in about a minute with the name tracing generator — type the name, pick a row size, download the PDF. But the lines themselves are worth understanding first, because they're not decoration. They're the lesson.
What the three lines actually teach
A tracing worksheet with lines gives every letter a address system:
- The top line — where tall letters (M, h, l) stop just short of. Reaching for it is what makes capitals look confident instead of startled;
- The dashed middle line — the waistline. Most lowercase letters live between here and the bottom;
- The bottom line — the baseline. Everything stands on it; the "drifting baseline" problem in adult handwriting starts here too.
I walk through the full letter-family system (tall letters, small letters, tail letters) in kindergarten handwriting paper, explained. The short version for name tracing: the lines are the teaching. A child who fills a ruled band correctly is doing three jobs at once — sizing, spacing, and orienting — without anyone saying "slow down."
One honest note, because I get this question at every parent conference: the tracing letters on our sheets are dotted outlines, not light-gray solids, and each page leads with a dark model row in solid print. The model row is the target; the dotted rows are guided practice; the last rows are the transfer test.
Which row height fits which age
This is the setting parents get wrong most often. Bigger is not easier forever — a band that's too tall makes letters float around inside it. Match the row height to the writer:
| Writer | Row height | Labeled on the tool | What it looks like |
|---|---|---|---|
| Preschool / Pre-K (3–4) | ~1.25 in | "Pre-K" | Whole-arm letter movements, plenty of room to overshoot |
| Kindergarten (5–6) | ~0.94 in | "Kindergarten" (default) | The classic worksheet band most K classrooms use |
| Grade 2+ (7–8) | ~0.71 in | "Grade 2" | Smaller, tighter spacing — for writers who already control size |
The upgrade rule I use in class: when a child fills the band top-to-bottom on most letters without prompting, drop one size. The struggle rule runs the other way — if every row is a fight, the band is too small. Go up, not back.
Print one in 60 seconds
Here's the exact workflow, with the settings I use for a kindergartner:
- Open the name tracing generator and type the name — one name per line. Each line gets its own dark model row, so a list of your whole class (or your three kids) turns into a matched set;
- Keep the font print-style. The default, Patrick Hand, is a clean print hand — letter shapes should match whatever you're currently teaching. Cursive names are a different lesson;
- Leave "Dark example row" on. That first solid row is doing the modeling;
- Set row height by the table above — the Kindergarten preset (~0.94 in) is right for most five-year-olds;
- US Letter, download the PDF, print at 100% scale.
The printed page gives you Name and Date lines at the top, the dark model row, then dotted rows for the rest of the page. That's a week of warm-ups from one sheet.
When the child fights the pencil
Every classroom has one, and every family meets them eventually. When tracing turns into a standoff, I change the conditions before I change the expectations:
- Air-trace first. Write the name in the air with a giant invisible pencil, whole arm, twice. Then one row with a fat crayon, then pencil. Finger-tracing the dotted outlines counts as practice — the motor plan is the point;
- Let them choose the name. The dog's name, grandma's name, a superhero's name. Motivation first, repetitions second — the format does the teaching either way;
- One line per day beats a full page on Sunday. Two minutes, done while the paint dries. Stop while it's still fun; a traced name should never cost tears twice in one week;
- Check the pencil, not the child. A chubby starter pencil and a page that doesn't slide around fix more "attitude" problems than any pep talk.
And if today just doesn't work — put the sheet on the fridge, trace one name at dinner, and call it done. The lines will be there tomorrow.
Two questions I hear every week
"Dotted outlines or light-gray tracing letters — which is better?" Both teach. What matters is the sequence: a dark model to look at, guided rows to trace, then an empty band to try alone. Our sheets do model → dotted → empty bands on the same page, so the last row is honest work, not tracing theater.
"Can I put more than one name on a sheet?" Yes — one per line, and each gets its own model row. For homework packets I type the full first name on line one and the nickname on line two. For the whole class, print one page per child; the generator keeps every setting.
Ready to print one? Name tracing generator — free, no account, and the PDF has no watermark. If you'd like blank ruled paper for after the tracing pages, the printable lined paper generator uses the same three-line bands.